


Fixing the VAIO P power issue
Story
Since the moment I got my VAIO P VGN-P31ZK (see in devices) it has been suffering from a weird issue: it would run just fine on battery power, but crash/shut down when AC power was connected.
At first, it just struggled to power on with AC connected, briefly flashing the screen white, but after a few tries it would turn on and start booting. It wouldn’t make it to the desktop, that would require a few more tries. After it reached the desktop, it was stable.
Over time, the issue got worse and worse: it wouldn’t stay on unless I let it run on battery for long enough to heat up. A-ha! Could be capacitors, but I thought that such a new and dense device wouldn’t be using a capacitor type vulnerable to such issues.
I tried to find other people who have this issue, since I couldn’t be the only one with a faulty device, but all I could find were very faint descriptions of the same fault. Until I encountered another person also with a P31Z suffering from the same exact fault on a Discord server. They were also clueless as to the source of the fault.
What brought the issue to light was a post over on the 4PDA forum thread for the VAIO P by user DJ_URAN, who also put a link to the post in their forum signature.
What a beautiful post indeed, showing the board schematic and the capacitors that are causing this instability. I don’t know how I’ve missed it, considering I’ve been reading that thread to find out other things about the device, like how to reprogram the battery after replacing the cells (coming soon).
Immediately I got the post translated in English and posted it over on the r/vaio subreddit to get more visibility on this issue. Then I ordered the required capacitors and waited for them to arrive.
Once the capacitors arrived, I installed them and the issue was resolved! :D
Symptoms
These are the symptoms I observed on my unit:
- The screen turns off, but LED lights stay on (Power, HDD, Charge and Wireless) when the charger is plugged in (a few times this happened while only powered from the battery)
- When turning on with the charger attached, display briefly flashes white
While this was happening, the battery charged just fine with the laptop turned off, sleeping or hibernating. Resuming from sleep with the charger connected also produces the same effect.
If your VAIO P is also encountering the same symptoms, the solution may be to replace a couple of capacitors.
Fixing the capacitors
The culprits
The power instability issue is caused by two capacitors placed on the +1.05VRUN (3.5A) and +1.8VSUS (3.5A) power rails, which go to the Intel US15W System Control Hub (which contains the GPU, memory controller, USB I/O and more) and the DDR2 memory.
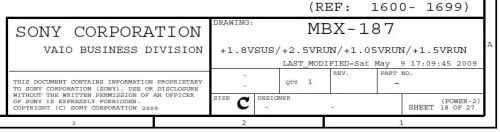
The circuit responsible for generating those power rails is described on page 18 of the MBX-187 motherboard schematic found in the VGN-P:
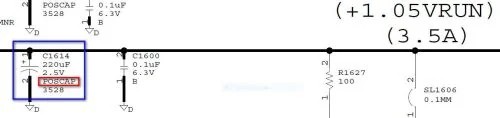
This is the first capacitor C1614, a 2.5V 220uF POSCAP:
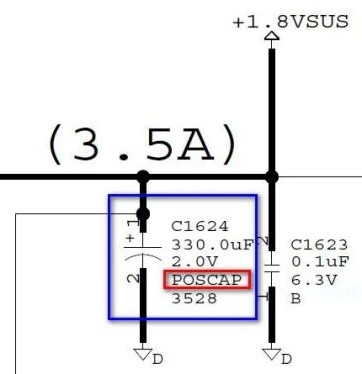
And this is the second capacitor C1624, 2.0V 330uF POSCAP:
Both of these capacitors are from Panasonic’s POSCAP series of Polymer Tantalum Solid Capacitors, which have a very small footprint and an equally low ESR of around 15 milli-ohms (see website). It seems like they have a tendency to fail either from age or heat, or maybe a combination of both (the VGN-P does get quite warm).
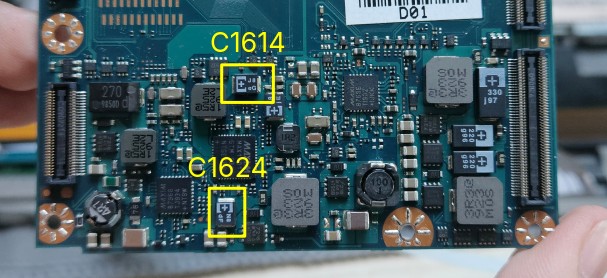
The capacitors can be found on the board in these two spots:
Replacement
For the replacement part, I decided as the two capacitors’ ratings are close enough to one another I would only pick a single replacement part type, so I went with 2.5V 330uF POSCAPs from Panasonic, in the 3528 footprint (L 3.5 x W 2.8 x H 1.9 mm), bearing the N8 ed marking (see datasheet page 16). After all taxes and shipping from China, it only costed me under 10 euros, while suppliers in the EU would’ve costed me double :)
There are two options for fixing the bad capacitors:
- The easy way: spread the legs of the new capacitors out and solder them on top of the old ones
- The hard way: desolder the old capacitors and solder on the new ones
While the 2nd way is the proper way to do it, I don’t have the right tools to pull off desoldering the capacitors, with how crammed in there they are. Most likely I’d end up damaging something else and doing more harm than good.
Seeing that OP (DJ_URAN) got away with just soldering the new caps on top, I proceeded to do the same.
Step 1. Spread them out
Put the capacitors in a small vice, bend the legs up and sand away the bottom
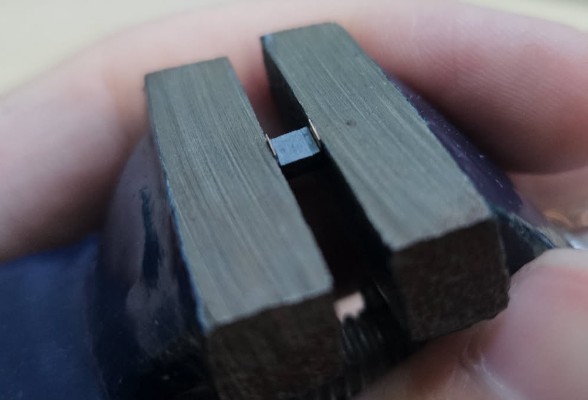
The easiest way to bend the legs up is to use a small cutter blade, as it’s thin and sharp enough to get behind it.
It’s important to sand the bottom surface, as that will make the legs reach the legs of the old capacitor better.
Step 2. Stack them up
Fit the new capacitor on top of the old one, making sure to match the polarity.
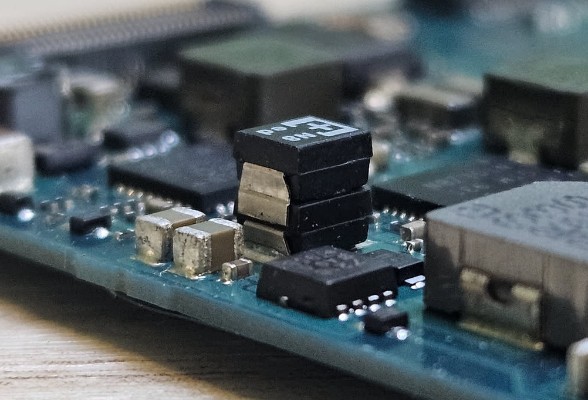
Step 3. Solder them on
Using a small soldering iron tip, a steady hand and some patience, solder the capacitors together.
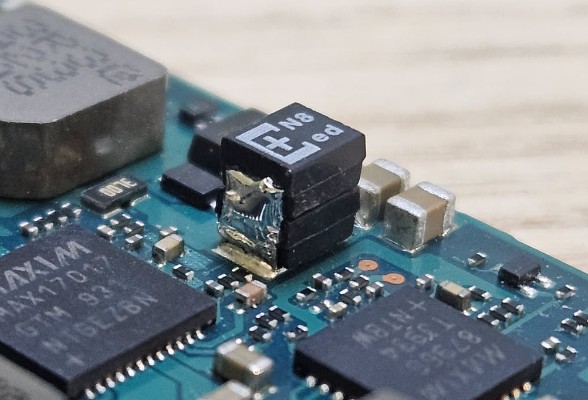
If you do it correctly, you should now have two capacitors in parallel and no shorts anywhere.
Step 4. Enjoy

Notes
While you’re at it, you probably should also replace the thermal pads. OP (DJ_URAN) has also mentioned that there are other capacitors that could cause trouble, but for now it seems like “replacing” these two has fixed my problem.
Since performing the fix, the crash described by the symptoms sections haven’t happened once, and I’ve tested it under all the conditions I’ve found that triggered the crash.